Transform 5 Plastic Bottles into Stunning Flowers with This Easy DIY Craft!
Transform Plastic Bottles into Stunning Flowers: A DIY Guide
- Introduction
- Required Materials
- Step-by-Step Instructions
- Creative Variations
- Common Mistakes
- FAQ
- Conclusion
Introduction
Have you ever found yourself staring at a pile of empty plastic bottles, wondering how to turn what seems like waste into something beautiful? It’s common to feel overwhelmed by clutter but also hopeful for creative solutions. In this guide, we’ll explore how you can transform those ordinary bottles into gorgeous flower decorations for your home or garden. Keep reading to discover the simple steps for this rewarding DIY project.
Required Materials
To get started on your plastic bottle flowers, gather these essential materials:
- Plastic bottles (any size will do, but larger bottles work well)
- Scissors
- Paint (acrylic or spray paint)
- Thick wire or wooden dowels (for stems)
- Hot glue gun and glue sticks
- Decorative elements (such as beads or glitter)
Once you have these materials ready, you’re one step closer to creating something beautiful!
Step-by-Step Instructions
Let’s dive into the process of transforming plastic bottles into stunning flowers:
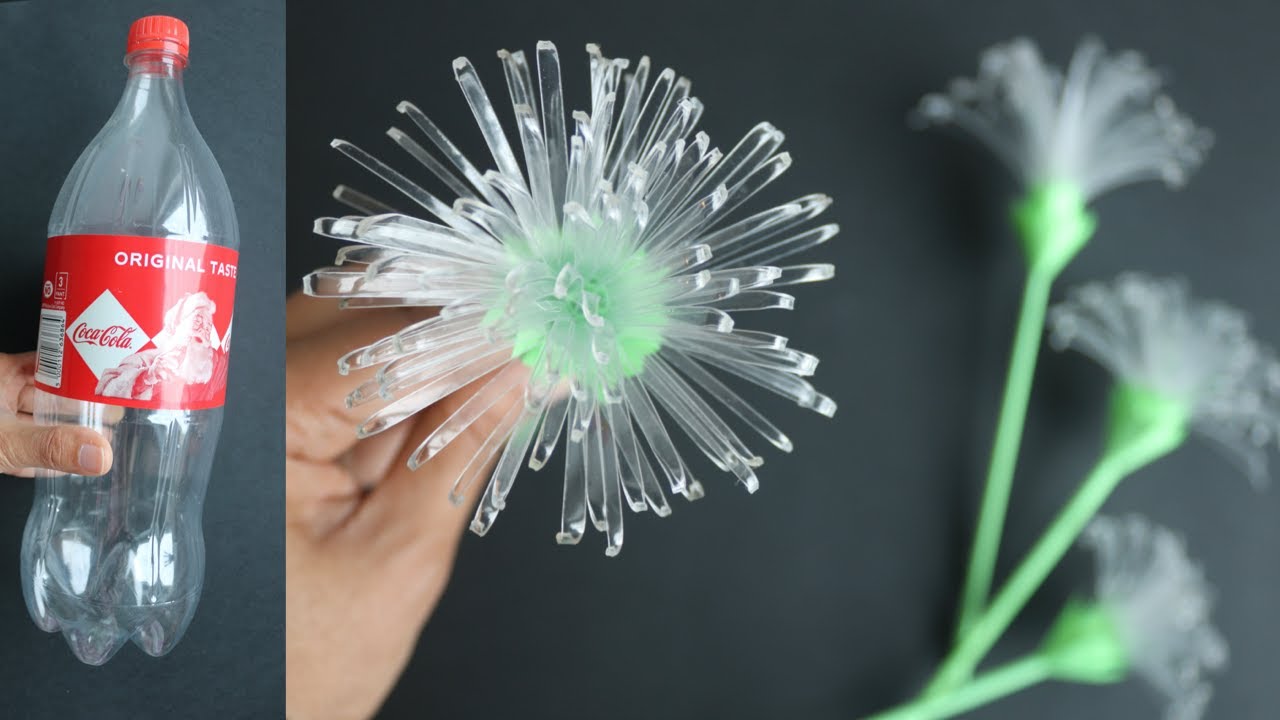
- Prepare your bottles: Rinse and dry your plastic bottles to remove any residue.
- Cut the petals: Using scissors, cut the bottle into petal shapes. Aim for 5 to 6 petals for a full flower.
- Shape the petals: Once cut, you can curl or taper the edges of each petal to add a more natural look. You can heat them slightly with a hairdryer for easier shaping.
- Paint the petals: Apply your chosen paint color to the petals. You can choose a single color or multiple shades for a multi-colored flower. Let dry completely.
- Assemble the flower: Use the hot glue to attach the petals together at the base. Make sure they overlap slightly for a fuller appearance.
- Attach the stem: Secure the thick wire or wooden dowel to the base of the flower with hot glue. This will act as your flower stem.
Your beautiful plastic bottle flower is now complete!
Creative Variations
Once you have mastered the basics, consider these creative variations to personalize your flowers:
- Color combinations: Experiment with different color combinations for a bouquet effect.
- Layering techniques: Try using bottles of different sizes to create flowers with layered petals for added dimension.
- Decorative touches: Add beads, buttons, or glitter to the center of your flowers for a charming finish.
These variations can help you make your creations truly unique and tailored to your style.
Common Mistakes
While creating your plastic bottle flowers, avoid these common pitfalls:
- Using the wrong paint: Ensure you’re using paint suitable for plastic to prevent peeling or fading over time.
- Cutting uneven petals: Strive for uniform petal shapes for a polished look.
- Overheating plastic: Be cautious when using heat; excessive heat can warp the plastic beyond repair.
By being mindful of these mistakes, you’ll enhance the quality of your creations.
FAQ
Can I use colored plastic bottles instead of painting them?
Yes, colored bottles can create beautiful flowers without the need for paint. Just ensure the color suits your desired look.
How do I display my plastic bottle flowers?
You can place them in vases, pots, or even group them together in a decorative arrangement outdoors.
Are these flowers weatherproof?
While they can withstand some weather conditions, it’s best to bring them indoors during extreme weather to prolong their life.
Conclusion
Transforming plastic bottles into stunning flowers is not only a fun project but also a fantastic way to recycle. With just a few steps, you can create beautiful decorations that brighten up your space. What unique colors or shapes do you plan to try with your bottle flowers? Share your ideas in the comments!