Lemon Raspberry Yogurt Cake with Glossy Frosting: Moist and Flavorful Recipe
Lemon Raspberry Yogurt Cake with Glossy Frosting: A Moist and Flavorful Recipe
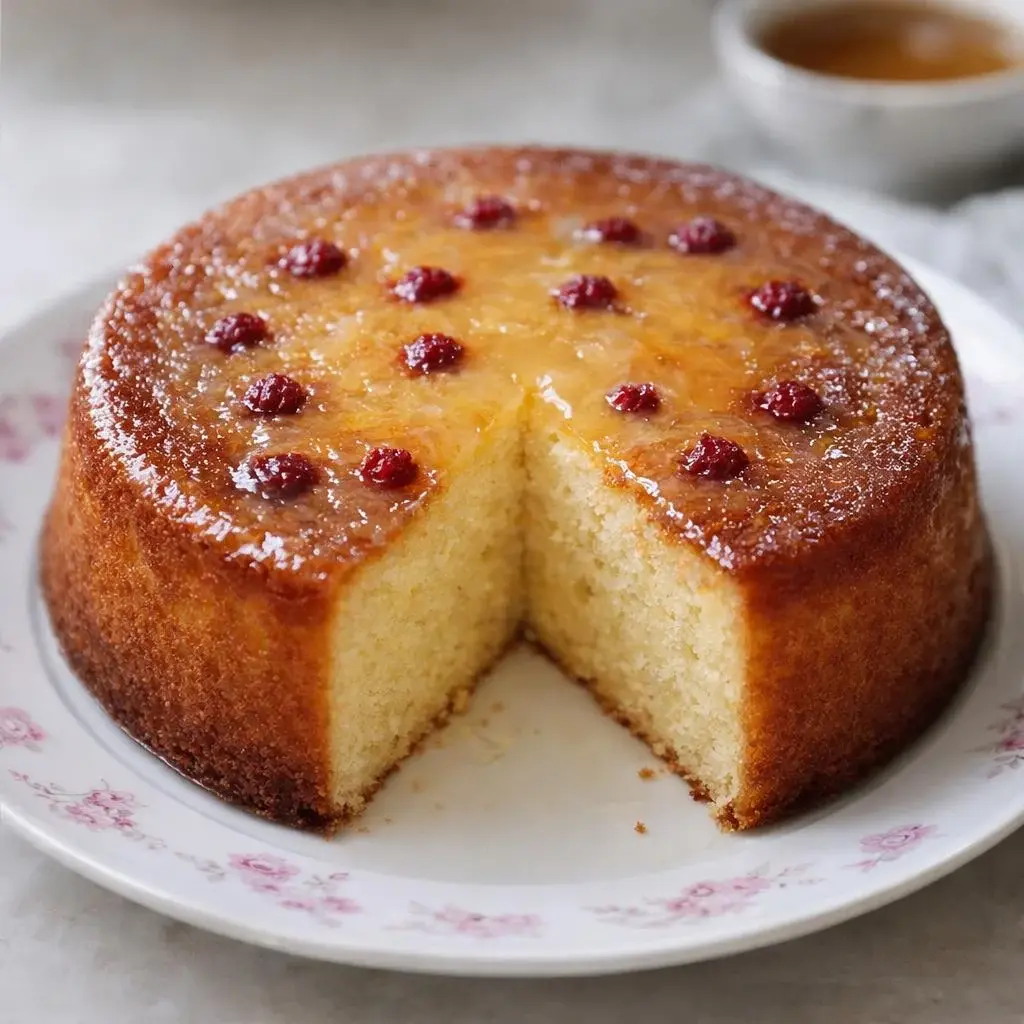
This lemon raspberry yogurt cake is the perfect Sunday dessert: simple to make, visually appealing, and nearly foolproof if you follow a few key steps. You’ll achieve a light yellow batter, tender like a well-made yogurt cake, enhanced with raspberries that add a touch of acidity and vibrant red highlights. Topping it off is a glossy lemon glaze that finishes the cake with a professional touch—without any complications.
Why You’ll Love This Lemon Raspberry Yogurt Cake
This cake succeeds because it follows a straightforward logic: a classic base (yogurt, eggs, flour, baking powder) for structure and moisture, melted butter (or neutral oil) for a tender crumb, and a citrusy addition (zest + juice) that awakens the flavors. The raspberries stay flavorful and visible if handled gently.
The result is:
- A slightly golden surface, with a thin, light crust;
- A light yellow, homogenous, moist interior;
- Red raspberry dots that hold their shape;
- A translucent, glossy lemon glaze that coats the top neatly.
The Secret to True Moistness: Batter Texture and Perfect Baking
A yogurt cake can quickly become “dry” if the batter is overmixed or baked too long. The key to this recipe is to aim for a soft, smooth batter without overworking it: the flour should be gently incorporated, the baking powder will do the rest, and the raspberries will provide moisture without making the batter soggy.
For baking, the oven should be preheated and the cake baked just long enough to firm up while maintaining a tender center. A well-baked cake will have a slight bounce in the center, and a knife inserted should come out clean or slightly moist (but not raw). We purposely avoid overbaking to preserve that “moist and tender” yogurt effect.
The glaze should be thin enough to pour but not so hot that it melts the top. A “warm to hot” temperature is what gives it a uniform shiny appearance.
Ingredients for a Truly Flavorful Lemon Raspberry Yogurt Cake
Here’s the complete list of ingredients, along with their roles. The amounts below correspond to the recipe (no adjustments needed for success).
The Cake Base (Moisture + Structure)
- Whole plain yogurt: 1 pot (125 g)
Role: Provides richness and tenderness. Whole yogurt helps achieve a moist crumb, making it more pleasant to eat and less dry. - Eggs: 3
Role: Bind and structure. They slightly aerate the batter and stabilize the texture during baking. - Sugar: 150 g
Role: Balances the acidity of the lemon and promotes golden coloring. Sugar also contributes to the glaze’s shine through light caramelization. - Melted butter (or neutral oil): 80 g
Role: Adds moisture and a tender crumb. Melted butter gives flavor, while neutral oil keeps the cake very moist and lighter. - Flour: 180 g
Role: Structurally supports the batter. Added without excessive mixing, it ensures a cake that holds together while remaining tender. - Baking powder: 1 packet (approximately 11 g)
Role: Provides rise, creating the effect of a well-leavened cake with a fine crust on the surface.
The Lemon (Flavor + Balanced Acidity)
- Untreated lemon: 1 (or 2 for a more pronounced flavor)
Role: The zest provides intense aroma; the juice balances the sweetness of the sugar. Together, they give a clean, bright flavor to the dessert. - Zest: 1 heaping tablespoon (about 1 lemon)
- Juice: 2 to 3 tablespoons (depending on lemon size)
The Raspberries (Bright Dots + Freshness)
- Fresh or frozen raspberries: 200 g
Role: Add flavor, light acidity, and a delightful surprise in every bite. Kept whole, they offer beautiful red dots and a pleasant fruity texture.
Important Tip: If using frozen, add them directly (without thawing) to limit excess liquid in the batter.
The Glossy Lemon Glaze (Smooth and Indulgent Finish)
- Icing sugar: 150 g (or sugar + a bit of water, based on preference)
Role: Provides a coating texture and a shinier finish. - Lemon juice: 2 to 3 tablespoons
Role: Adds acidity and flavor to the glaze. With lemon, the glaze remains elegant and isn’t cloying. - Water or milk (optional): 1 to 2 tablespoons (only if needed to thin out)
Role: Aids spreading to achieve a nice, even coating. - Raspberries for decoration: 6 to 10
Role: A visual touch. They should remain whole for a fresh, clean look.
Can It Be Adapted Without Breaking the Recipe? Reasonable Substitutions
- Melted butter vs. neutral oil: If using neutral oil, your cake will be very moist and slightly less “buttery” in flavor, but the result remains perfectly suitable.
Tip: If opting for oil, choose a neutral-flavored one (no olive or infused oils). - More intense lemon: If you love a bold lemon flavor, slightly increase the zest (always avoiding bitterness). The zest is your best aromatic weapon.
- Fresh or frozen raspberries: Both work well. The key point: do not thaw frozen ones. This helps maintain proper moisture and keeps the raspberries well-defined in the cake.
Choosing the Right Ingredients (Where It All Starts)
Yogurt
Opt for whole plain yogurt. This choice gives a moist crumb and a pleasant texture, especially with oven baking.
Untreated Lemon
An untreated lemon is ideal for maximizing zest without concerns. If unavailable, you can use only the juice, but the recipe will lack some aroma.
Raspberries
- Fresh: They should be firm, shiny, and vibrantly colored.
- Frozen: No problem—often they are great quality and convenient.
Flour and Baking Powder
Use standard flour (Type 45 or 55 as per habit) and ensure your baking powder is not expired. Expired baking powder leads to a denser, less risen cake.
Essential Equipment to Prepare Before You Start
- A round cake pan (ideally 20 to 22 cm). This size helps achieve the right height for a moist center.
- Parchment paper or butter + flour for easy release.
- A mixing bowl and a whisk or spatula.
- A zester (or fine grater) to obtain fragrant zest.
- A small saucepan or bowl to adjust the glaze’s texture.
- A rack to cool and possibly glaze comfortably.
Preparations Before Starting (Without Going into the Full Recipe)
Before launching into making the cake, take a couple of minutes to prepare your plan of attack:
- Preheat the oven to the indicated temperature for consistent baking.
- Grease and flour the round cake pan carefully (or line the bottom with parchment paper) to ensure clean release.
- Rinse and zest the lemon, then juice it. Set aside, adding the zest for maximum aroma.
- Prepare the raspberries: to limit “purple marbling” in the batter (often a problem with raspberries), you can lightly coat them in a dusting of flour before incorporation. This helps keep them intact and evenly distributed.
You’re ready! The next steps will involve assembling the batter, gently incorporating the raspberries, baking while monitoring moisture, and then preparing a glossy lemon glaze for a smooth and indulgent finish.
Step-by-Step Recipe Preparation
1) Preheating and Preparing the Pan
Preheat the oven to 180°C (355°F) (fan oven if possible). Generously grease the round cake pan (ideally 20 to 22 cm), and if you desire a flawless release, dust with flour or apply parchment paper well on the bottom and sides.
Why this is important: the yogurt cake is moist. A properly greased pan prevents the thin crust from sticking and deforming.
2) Mixing Eggs + Sugar + Yogurt + Fat
In a large bowl, crack the 3 eggs and add 150 g of sugar. Whisk for 1 to 2 minutes: the mixture should become lighter and slightly frothy.
Next, add 1 pot of whole plain yogurt (125 g). Whisk for another 20 to 30 seconds to smooth it out.
Add the fat: 80 g of slightly cooled, melted butter (or neutral oil). Mix just enough to achieve a homogenous batter.
Desired texture at this stage: a well-blended, pale yellow, fluid batter that “ribbons” gently when you lift the spoon.
3) Incorporating Flour + Baking Powder (Without Excessive Work)
In a bowl, mix 180 g of flour and one sachet of baking powder (approximately 11 g), and sift if you prefer an even finer crumb.
Add the flour in 2 portions to the batter. Incorporate with a spatula or spoon, turning gently. Stop as soon as the flour disappears; no need to beat.
Key Point: Overworking the batter may make it less airy and slightly denser.
4) Adding Lemon Flavor
Zest the lemon (about 1 heaping tablespoon) and add it to the batter.
Then gradually add the lemon juice, starting with 2 tablespoons, and adjust to 3 tablespoons based on taste and consistency: The batter should remain pourable, not thick like a loaf cake.
You should achieve a clear scent—fresh, intense, and “clean lemon.”
5) Preparing the Raspberries and Incorporating Gently
Drain them if they are very wet. If using frozen raspberries, do not thaw them: this limits excess moisture and keeps the dots beautifully defined.
To limit the “purple marbling”: you can (optional) quickly coat them with a light dusting of flour taken from the 180 g (just a few grams). Shake off the excess.
Pour the batter into the pan. Distribute the raspberries by gently pressing them in: they should be present in the batter without disappearing completely.
Important: Incorporate very gently if you choose to mix them into the batter (otherwise, spread them over the surface). After adding, do not overmix.
6) Baking: Aim for a Golden Crust and Moist Center
Place in the oven at 180°C (355°F) for 35 to 45 minutes.
Visual markers:
- The surface should become slightly golden, with a fine crust;
- The edges should pull away slightly.
Baking test: insert a knife in the center. It should come out clean or with a small moisture trace (no raw batter).
Chef’s Tip: If your oven runs hot, lower the temperature to 175°C (347°F) halfway through to prevent the top from browning too quickly.
7) Cooling Before Glazing and Unmolding
Remove the cake and let it cool in the pan for 10 to 15 minutes.
Then, if necessary, run a spatula or thin knife around the edges, unmold, and let cool an additional 5 to 10 minutes.
Why: a hot cake can “drink” the glaze and lose its shiny translucent effect. Warm, it coats perfectly.
8) Glossy Lemon Glaze: Even Coating
In a bowl, mix 150 g of icing sugar with 2 to 3 tablespoons of lemon juice.
If the glaze is too thick: add 1 to 2 tablespoons of water or milk (optional), one spoon at a time until you achieve a pourable consistency.
Option for shine: heat for 10 to 20 seconds in the microwave or over very low heat, just to thin it out (the glaze should not cook or thicken). Stir well.
Desired look: a thick yet pourable texture that forms a ribbon and falls to cover the surface without leaving “holes.”
9) Glazing the Cake and Decorating
Place the cake on a rack (or a plate with edges) to allow any excess to spread easily.
Glaze with the lemon icing while it’s still warm/liquid: pour it in the center and gently spread if needed.
Decorate with 6 to 10 raspberries: place them on top, slightly spaced apart.
Expected Effect: as it cools, the glaze sets and becomes smooth and shiny.
10) Wait for the Right “Set” Before Slicing
Let the cake cool for 20 to 30 minutes before cutting.
Texture upon serving:
- Shiny surface with a slightly gelatinous texture;
- Light yellow crumb, moist;
- Visible raspberries with distinct red dots;
- Prominent lemon aroma.
Signs of Success (What You Should See in the Kitchen)
- Evenly golden surface, fine crust.
- In the center: slight bounce when touched, no dense indentation.
- Upon slicing: homogenous crumb, light yellow, moist (not dry), with raspberries mostly intact.
- Glaze: coats without sinking, translucent and shiny.
Common Mistakes to Avoid
- Overbaking: extending the time will dry out the cake’s tender center.
- Overworking the flour: this results in a denser crumb.
- Thawing frozen raspberries: creates excess moisture, leading to purple marbling and a soggy cake.
- Using glaze that’s too cold: causes poor spreading and may create matte spots.
- Unmolding while hot: the fine crust may break.
Pro Tips for the Best Results
- Use cooled melted butter (or neutral oil): if too hot, it can “cook” the eggs on contact and make the batter less smooth.
- For a brilliantly shiny glaze: adjust the fluidity. A glaze that’s too thick solidifies into a lump, while one that’s too liquid runs off and forms a thin layer.
- Decorate at the last minute: the raspberries remain beautiful and colorful.
Variations (Without Changing the Spirit of the Cake)
- More lemony: slightly increase the zest (always avoiding excessive bitterness) and keep the juice between 2 and 3 tablespoons according to the lemon’s natural acidity.
- Raspberries with more definition: lightly coat them in flour before baking and avoid mixing them too much into the batter.
- For a slightly thicker glaze: if you prefer a firmer layer, add a spoonful of icing sugar rather than increasing the water.
What to Serve with It?
This lemon raspberry yogurt cake is perfect for an afternoon snack or light dessert.
- With black tea or bergamot green tea: the lemon shines without being overly acidic.
- With coffee (either espresso or cream): creates a delightful contrast.
- Extra option: a dollop of cream or a touch of lightly sweetened whipped cream.
Presentation for a Beautiful Display
Serve it on a round platter. If you’re cutting clean slices, wipe the knife blade between cuts: this keeps the glaze smooth without cracks.
You can also add a few raspberries around the edge during serving to enhance the “fresh” visual appeal.
Storage and Reuse
- At room temperature: 1 to 2 days under a dome (the glaze stays attractive).
- In the refrigerator: up to 3 days, still covered. The cake remains moist but the glaze may firm up.
To restore it to its original glory, take it out 20 to 30 minutes before serving.
Prep Ahead (Great for Entertaining)
You can prepare the cake the day before: keep it cool under a dome. For the glaze, make it on the day itself (or at the latest, the next morning). A freshly made glaze always looks better.
Nutritional Information
For reference, per slice (of 10 slices, depending on cut): approximately 320–380 kcal. The cake is rich in carbohydrates (sugar + flour) and fats (butter/oil), while the raspberries provide fiber and natural acidity.
FAQ
How can I tell if my lemon yogurt cake is baked without drying it out?
Trust the center: a knife should come out clean or with a small moisture trace, never raw batter. The surface should be golden and have a slight bounce. If needed, continue baking for a maximum of 5 minutes.
Should I thaw frozen raspberries before adding them to the cake?
No. To keep the cake moist and maintain distinct red dots, keep the frozen raspberries. Thawing releases water, soaking the batter and increasing purple marbling.
My lemon glaze turns opaque: how do I restore the shiny finish?
Most often, it’s a matter of fluidity or temperature. Adjust with a spoonful of water/milk if too thick, then glaze while it’s warm. If allowed to cool too much, it thickens and loses its translucent effect.
Can I make the glaze ahead of time and reuse it?
You can prepare the glaze a few hours in advance, but keep it covered and slightly reheat to thin it out (10–15 seconds) before glazing. For optimal results, glaze and decoration just before serving yield the best shine.
How do I store the cake to keep a moist center?
After baking, let it cool, then store it under a dome. At room temperature, it lasts 1–2 days. In the fridge, up to 3 days, but remember to take the cake out 20 to 30 minutes before serving: the texture becomes more enjoyable.
Conclusion
You have everything you need to succeed with the Lemon Raspberry Yogurt Cake and Glossy Glaze: a moist batter, well-defined raspberries, and a lemon topping that looks “picture-perfect.” Try it at the next gathering, share a photo, and keep this recipe handy for those moments when you want a simple, beautiful, and truly flavorful dessert.