Creamy Butter Apple Cake: A Soft and Decadent Delight
Creamy Butter Apple Cake: A Soft and Decadent Delight
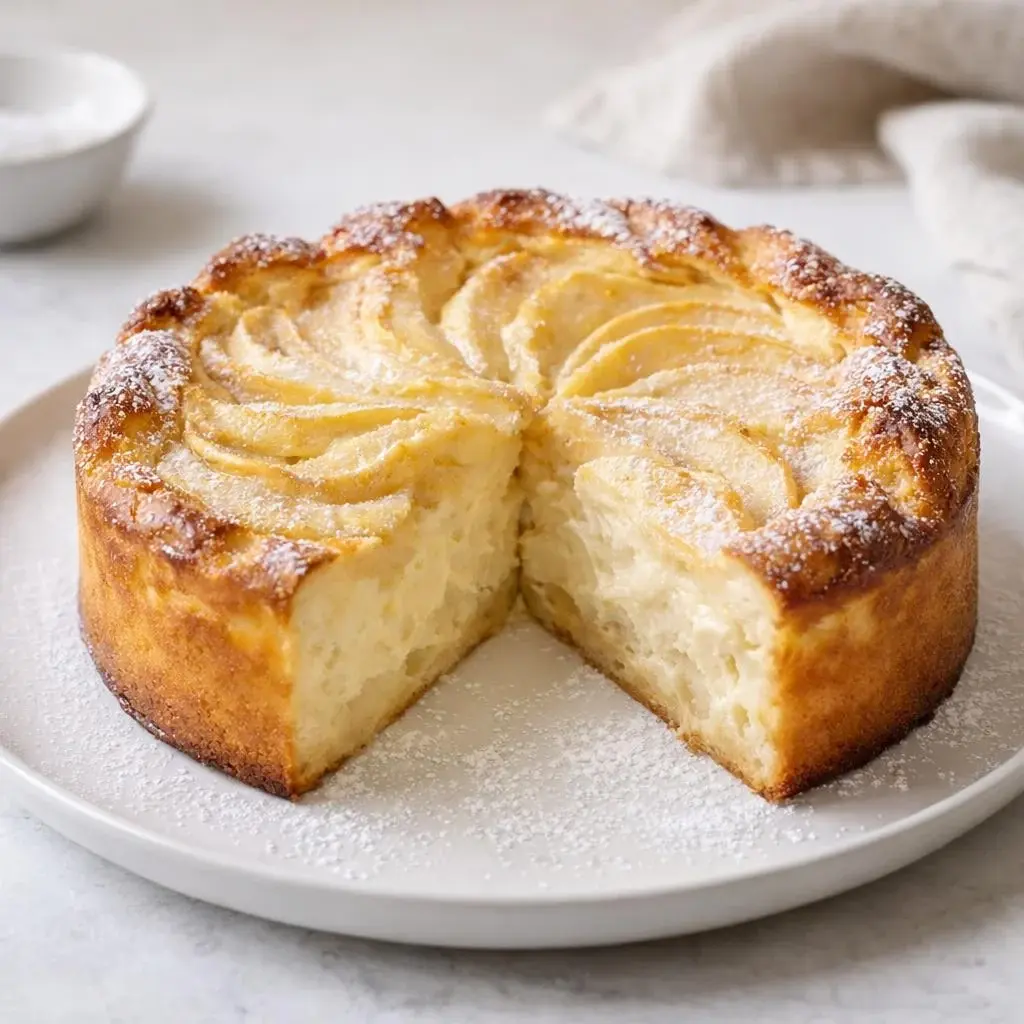
If you’re looking for a creamy apple cake that is neither a simple pie nor a dry cake, you’re in for a treat with this version. It features a soft vanilla base and thinly sliced apples arranged in a rosette. The result is a dessert that is fragrant with vanilla, boasting a golden surface and a tender, almost creamy center.
What You’ll Achieve (And Why It’s So Good)
The charm of this creamy apple cake lies in its balance. The apple slices are thin enough to cook uniformly while remaining tender. Meanwhile, the cream sets in the oven without becoming rubbery. This results in a texture reminiscent of a pie, but with the body of a cake: a softer center and slightly firmer edges that slice neatly.
Key Elements of the Recipe
- A batter made from eggs, sugar, and flour that provides structure and moisture.
- A milk and vanilla cream that binds and flavors the cake.
- Finely sliced apples arranged evenly for uniform cooking.
Ingredients for a Creamy Apple Cake
Here’s the foundational recipe to achieve the perfect “pie/cake” texture with cream and butter, along with the purpose of each ingredient.
Eggs: For Structure and a Well-Set Cream
- 3 eggs
The eggs form the structure. As they cook, they trap moisture and ensure the cream sets while remaining tender, preventing the cake from collapsing and preserving the soft center.
Sugar: For Moisture and Golden Color
- 120 g of sugar
Sugar naturally sweetens and contributes to the cake’s color, helping create a golden beige crust in the oven while enhancing moisture and creating a smoother batter.
Flour: For Balance Between Moisture and Structure
- 100 g of flour
The flour adds the right structural balance. Too little will cause it to collapse, while too much will weigh it down. The goal is a cake that holds together but remains soft when sliced.
Baking Powder (Optional but Recommended)
- 1/2 packet of baking powder (about 4 to 5 g)
This helps the cake rise slightly, giving it a smoother and slightly domed surface. Recommended if you prefer a more cake-like result.
Butter: For Flavor and Structure
- 80 g of butter
Butter adds richness and a melting texture. It also improves the cream’s stability during baking. For this recipe, use melted (or very softened) butter for easy incorporation.
Milk (or Variants): For Creaminess
- 200 ml of milk
The milk adds moisture and creaminess. You can substitute with:
- 200 ml of liquid cream (richer and smoother)
- 200 g of plain yogurt (lighter with a slightly tangy flavor, yet still delicious).
Vanilla: For Signature Flavor
- 1 vanilla bean (or 1 tsp of vanilla extract)
Vanilla imparts that “homemade pastry” essence. Using a bean provides a rounder aroma, while extract disperses well.
Apples: For the Rosette and Tenderness
- 4 to 5 apples (about 700 to 850 g once peeled)
Opt for Golden or Fuji apples: they are fragrant, slice well, and remain tender without turning to mush. The goal is flexible slices that cook evenly without drying out.
Choosing the Right Apples
To create a creamy apple cake, the thickness of the slices is crucial. Too thick will lead to an uneven rosette and less uniform cooking. Aim for firm apples with skins that don’t tear easily when sliced.
Shopping Tips:
- Select apples that hold their shape (not too floury).
- If using very juicy apples, cut them into thin slices: they will soften but should not disintegrate.
Can Ingredients Be Substituted Without Losing Creaminess?
Yes, but with common sense.
Milk / Cream / Yogurt Variants:
- Milk: perfect balance (moisture + firm cream).
- Liquid cream: richer and smoother, ideal for dessert lovers.
- Plain yogurt: lighter with a pleasantly tangy texture.
Vanilla Alternatives:
- Powdered vanilla or extract works well.
- Avoid strong flavors (rum, spices) if you want to maintain a subtle “family pastry” taste.
Baking Powder Alternatives:
- If baking powder is unavailable, you can omit it. The cake may be slightly less airy, but the eggs and butter will still provide tenderness.
Essential Tools for Success
- A cake pan (ideally 20 to 24 cm): a well-fitting pan helps achieve the right thickness for a melting center.
- Parchment paper or greasing + flour for the pan.
- A large bowl for mixing.
- A whisk (or mixer) to ensure a homogeneous batter.
- A sharp knife or mandoline for slicing the apples thinly (a key point).
Preparation Steps Before Starting
Before making the batter and cream (reserved for Part 2), take a moment to organize your workspace. Simple actions that avoid 80% of mishaps.
Preheat and Prepare the Pan:
Ensure your oven is hot. Grease your pan thoroughly and, if desired, line with parchment for easier removal without damaging the apple rosette.
Prepare the Apples: Peeling and Slicing:
Peel the apples and remove the cores. Cut them into very thin slices. Ideally, aim for uniform thickness: this ensures even cooking and a lovely rosette presentation.
Organize Ingredients:
Gather eggs, flour, sugar, butter, milk (or variant), vanilla, and apples. Since the recipe relies on a cream that must incorporate without lumps, this step saves time and prevents forgetting an ingredient.
Visual Goals to Keep in Mind
When arranging the apples, think “spiral from the center outward.” The final color should remain golden beige, not brown. Controlled cooking helps achieve a well-set cream with a tender heart.
Key Limitations to Know Before Baking
- Don’t slice apples too thick (they may dry out in the center).
- Avoid overcooking: the surface should be golden, but the center must remain tender.
Step-by-Step Recipe Preparation
1. Prepare the Pan and Preheat the Oven:
Preheat the oven to 180°C (355°F, fan-assisted if possible). Grease a 20 to 24 cm pan and place a layer of parchment at the bottom (or grease + flour). A well-prepared pan helps prevent apple slices from sticking and aids in unmolding.
2. Whisk the Base Vanilla (Soft Batter):
In a large bowl, crack the 3 eggs. Add the sugar and whisk for 1 to 2 minutes on medium/high speed. The mixture should become lighter and slightly frothy, falling slowly from the whisk. Don’t aim for a firm foam; a smooth and airy base is key.
Incorporate the flour (and baking powder if using) in two batches, using the whisk or a spatula. Mix just enough to create a smooth batter, without pockets.
Then, pour in the milk (or cream/yogurt, as chosen) and add the vanilla (scraped from the bean or as extract). Whisk for another 30 seconds to 1 minute: the cream/batter should be homogeneous and smooth.
3. Add the Melted Butter:
Melt the 80 g of butter and let it cool for a few minutes. It should remain liquid but not hot. Pour it into the batter and mix until you achieve a uniform texture. The batter should appear glossier and easy to pour, without lumps.
4. Slice the Apples Very Thinly:
This is the key to a beautiful rosette and even cooking. Peel 4 to 5 apples (about 700 to 850 g peeled). Cut into very thin slices (ideally a few millimeters). If you have a mandoline, it’s perfect: uniformity makes a difference.
Tip: If the slices start to brown, keep them in the shade and use them quickly. No need to drown them in lemon juice: we want to preserve their lovely color.
5. Arrange the Apples in Rosette (Spiral from Center Out):
Pour the batter into the pan. It will be quite liquid; that’s normal. Arrange the apple slices in a rosette, starting from the center and spiraling outward. The slices should slightly overlap so that each portion contains apples.
Chef’s tip: Lightly tap the pan on the work surface once the rosette is finished. This helps the batter rise between the slices and ensures even cooking.
6. Pour/Distribute the Cream Over the Apples, Then Smooth:
For this recipe, the batter/cream is poured before baking, but the aim is to fully submerge the apples to achieve that creamy pie/cake texture.
Smooth the top with a spatula: aim for a uniform surface where the rosette is clearly visible, without dips.
7. Baking: Monitor the Golden Set:
Bake at 180°C (355°F) for 35 to 45 minutes. Signs of success to watch for:
- The surface should turn golden beige (not dark brown) and rise slightly.
- At the end of baking, the center must be set: when you gently shake the pan, the cake should wobble a little but not look like liquid cream.
- If you insert a knife into the center, it should come out with a little moisture but no raw dough.
If your oven runs hot or if the apples start browning too much, cover with a sheet of parchment for the last 10 minutes to protect the surface.
8. Cooling Then Unmolding (Otherwise It Will Collapse):
Remove the cake from the oven and let it cool for 15 to 25 minutes in the pan. Why? The eggs and flour finish setting gently. When hot, the cream is more fragile; while warm, it becomes tender yet holds its shape.
Carefully unmold: run a thin blade along the edges if necessary, and then turn it out onto a cooling rack or plate. Let it cool for another 5 minutes before cutting.
Expected Texture When Sliced
- Edges: slightly firmer, cake-like.
- Center: tender and slightly creamy, not liquid.
- Apples: tender, barely glazed, and fragrant with vanilla.
Visual Signs and Avoidable Mistakes
- Overcooking = dark brown and less tender center. Maintain controlled cooking and rely on visual cues, not just time.
- Apples too thick = uneven cooking. They may remain firm in the center. Hence, the importance of thin slicing.
- Insufficiently blended base = lumps and irregular texture. Mix the flour + liquid well, then add the slightly warmed melted butter.
- Unmolding too soon = rosette collapsing. Wait for it to cool slightly.
Tips for a Smooth, Golden Surface
For a uniform surface, smooth it out after placing the apples, then lightly tap. If you want a photogenic finish, a light dusting of powdered sugar just before serving can be lovely, but avoid overdoing it as it may mask the texture.
Possible Variations (Without Changing the Cake’s Essence)
- Richer and Smoother Version: Use 200 ml of liquid cream instead of milk. This results in a rounder, more indulgent cake.
- Lighter Version: Substitute with 200 g of plain yogurt. The cake remains moist, with a pleasant tang.
- Vanilla Flavor: Prefer a scraped vanilla bean if available; it adds a subtler flavor; otherwise, extract works well.
- Baking Powder: Use 1/2 packet (4 to 5 g) for a slight rise. Without it, the cake remains good but will not rise as much.
Serving and Presentation Tips
Serve the cake warm or at room temperature: the apples will be melting, and the creamy center will be most enjoyable.
- Preferably cut into neat slices with a well-wiped knife between cuts.
- For a “photo-worthy” effect: lightly dust with powdered sugar on top at serving time.
Natural Pairings
- A cup of coffee or black tea.
- For those with a sweet tooth: a dollop of cream (or a scoop of vanilla ice cream) as an accompaniment when serving.
Storage and Reheating
Store the cake covered (in a dome or plastic wrap) at room temperature for 1 to 2 days, then in the refrigerator for up to 3 days.
To regain a creamy texture:
- Reheat in the microwave for 20 to 30 seconds per slice, or in the oven for 5 to 8 minutes at 160°C (320°F). The goal is to warm it, not dry it out: stop when the center becomes soft again.
Preparing in Advance
You can prepare it the day before. Let it cool completely and store covered. The next day, reheat gently or serve at room temperature.
Practical Note: After 24 hours, the apples may release a bit more juice, enhancing the “creamy pie” aspect.
Approximate Nutrition
For reference (per slice, depending on the number of servings): about 280 to 380 kcal. This varies largely based on milk/cream choice and slice size. A lighter version with yogurt helps reduce the “heaviness.”
FAQ (Quick Answers)
What pan is best for a creamy apple cake?
Ideally, use a 20 to 24 cm pan. A larger pan will make the cake thinner and less “creamy at the center.” A smaller pan may rise too much and bake unevenly. The goal is enough thickness for a soft base and tender apples.
How can I tell if the cake is baked without overcooking it?
Look for the color: the surface should be a golden beige and slightly puffed. The center should be set but still tender: gently shaking the pan should create a slight wobble. Inserting a knife into the center should come out with a little moisture, not raw dough.
Why do my apples remain firm or, conversely, become too soft?
Firm apples often result from slices being too thick: cut them finely. Overly soft apples indicate a too-hot oven or overly long baking. Set your timer for 35 to 45 minutes and cover if they brown too much.
Can I use yogurt instead of milk or cream?
Yes, you can substitute with 200 g of plain yogurt. The cake remains moist and retains the pie/cake texture with a slight tang. If the yogurt is very liquid, mix thoroughly for a smooth base before adding the melted butter.
Can this creamy apple cake be frozen?
Freezing is possible but may alter the “creamy” texture. Let it cool completely, wrap in slices or whole, and freeze for up to 1 month. Thaw in the refrigerator and reheat gently to regain moisture.
Conclusion
You now have everything needed to succeed with this creamy apple cake featuring butter: a beautiful rosette, golden bake, and a tender heart. Try it for a seasonal treat, keep it handy for impromptu dinners, and share it: your loved ones will undoubtedly ask for the recipe.