5 Simple Steps to Fix Your Broken Charging Cable and Save Money!
5 Simple Steps to Repair a Broken Charging Cable
Introduction
Have you ever found yourself in a situation where your phone or tablet refuses to charge because of a frayed, broken cable? It can feel frustrating, especially when you realize that replacing a charging cable can be surprisingly expensive. Instead of rushing out to buy a new one, consider fixing it on your own. With just a few materials and simple steps, you can bring your cable back to life. Let’s explore how you can repair your broken charging cable and save money!
Required Materials
Before diving into the repair process, gather these essential materials to make your task easier:
- Electrical tape – To insulate the repaired sections.
- Scissors – For cutting the cable and tape.
- Soldering iron – If you need to make more advanced repairs.
- Replacement connectors – For damaged USB or charging ends, if needed.
- Wire strippers – To expose the inner wires of the cable.
Step-by-Step Repair Guide
Follow these simple steps to effectively repair your broken charging cable:
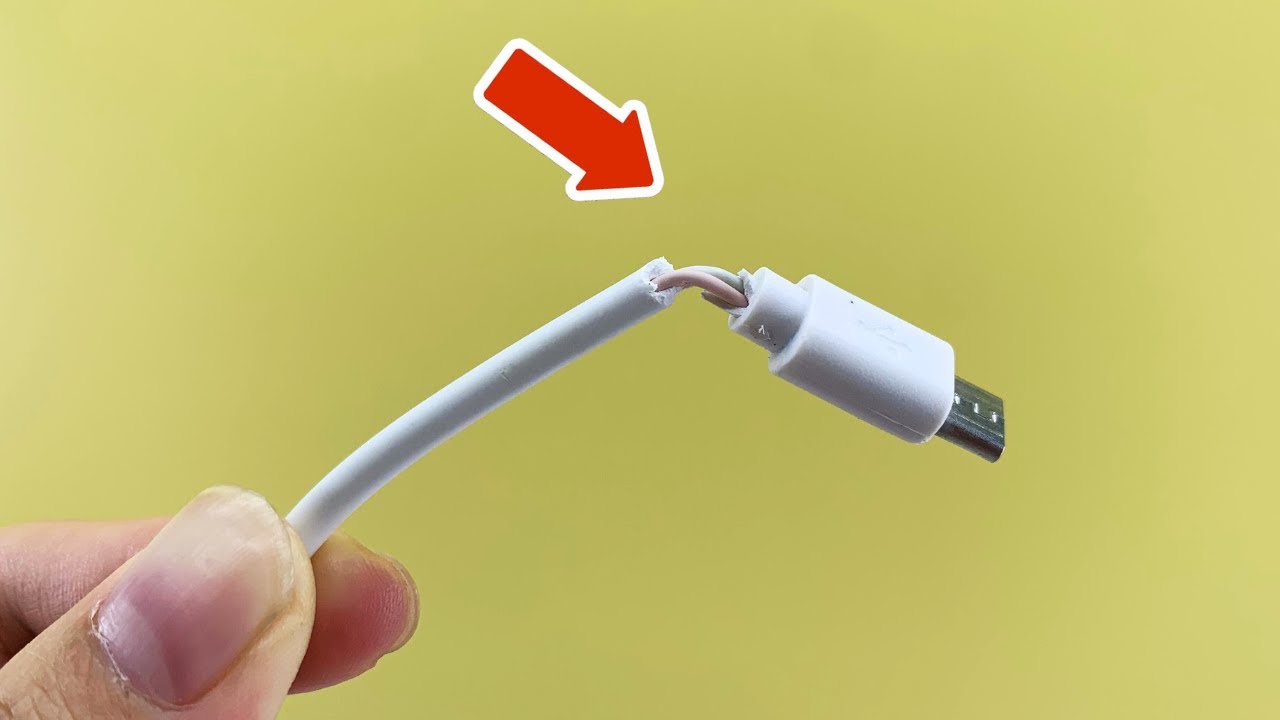
1. Inspect the Cable
Begin by examining your charging cable. Look for any signs of wear, such as frays, cuts, or exposed wires. Pinpoint the damaged area, as this will be your focus during the repair.
2. Cut the Damaged Section
If the damage is significant, use your scissors to cut away the faulty section. Make sure to leave enough length on both sides for effective repairs.
3. Strip the Wires
Using the wire strippers, carefully remove about half an inch of insulation from the ends of each wire inside the cable. This will expose the metal wires needed for reconnection.
4. Reconnect the Wires
If the wires are intact, twist them back together securely. If the connections are broken, use a soldering iron to join the wires. Ensure each wire is properly connected to avoid potential malfunctions.
5. Insulate with Tape
Wrap the repaired section with electrical tape to protect the exposed wires from any external damage. Make sure to cover the area thoroughly to prevent future issues.
Common Mistakes to Avoid
While repairing your charging cable, be mindful of these common mistakes:
- Not inspecting the entire cable – Focusing only on one section may overlook additional damaged areas.
- Using too much force – Applying excessive pressure while connecting can cause further damage.
- Neglecting insulation – Failing to properly insulate repaired sections may lead to short circuits.
- Using the wrong tools – Not using specific tools for the job can complicate repairs.
- Ignoring cable compatibility – Ensure replacement connectors are compatible with your device for successful charging.
FAQ
1. Can I repair my charging cable with duct tape?
Duct tape can hold the cable together temporarily but may not provide adequate insulation. It’s best to use electrical tape for a more reliable repair.
2. How can I tell if my charging cable is beyond repair?
If multiple sections are frayed or the charging connector is damaged, it might be more practical to replace the cable instead of attempting repairs.
3. Are there safety precautions I should take when repairing my cable?
Always ensure the cable is unplugged before you start repairing it, and be cautious with the soldering iron to avoid burns.
Conclusion
Repairing a broken charging cable is not only a quick fix but also a way to save money on replacements. By following the steps outlined above, you can extend the life of your essential tech accessories. Would you consider trying to repair your own charging cables instead of purchasing new ones? Share your thoughts in the comments!