5 DIY Steps to Create a Unique Colorful Basket with Paper Rattan Strips
5 DIY Steps to Create a Unique Colorful Basket with Paper Rattan Strips
Required Materials
Creating a colorful basket with paper rattan strips offers a delightful way to add a personal touch to your home decor. Before diving into the project, gather the necessary materials. This ensures that you have everything at your fingertips to keep the creative flow going.
- Paper rattan strips in various colors—these are lightweight and easy to work with.
- Hot glue gun with glue sticks—essential for connecting the strips.
- Scissors for cutting strips to size.
- Measuring tape to ensure uniform sizes.
- A round base or mold to help shape your basket.
With your materials ready, you’re set to start creating something beautiful.
Step-by-Step Guide
Crafting your colorful basket can be broken down into manageable steps. Follow this structured approach to ensure your project is smooth and enjoyable.
1. Prepare Your Base
- Measure the desired size of your basket and cut your base material according to that size.
- Secure the base onto a stable surface to prevent it from moving while you work.
2. Cut Your Rattan Strips
To get started, you’ll need to cut your paper rattan strips:
- Cut strips into two different lengths: longer ones for the base and shorter ones for the sides.
- Ensure each strip is of consistent width to maintain an even look.
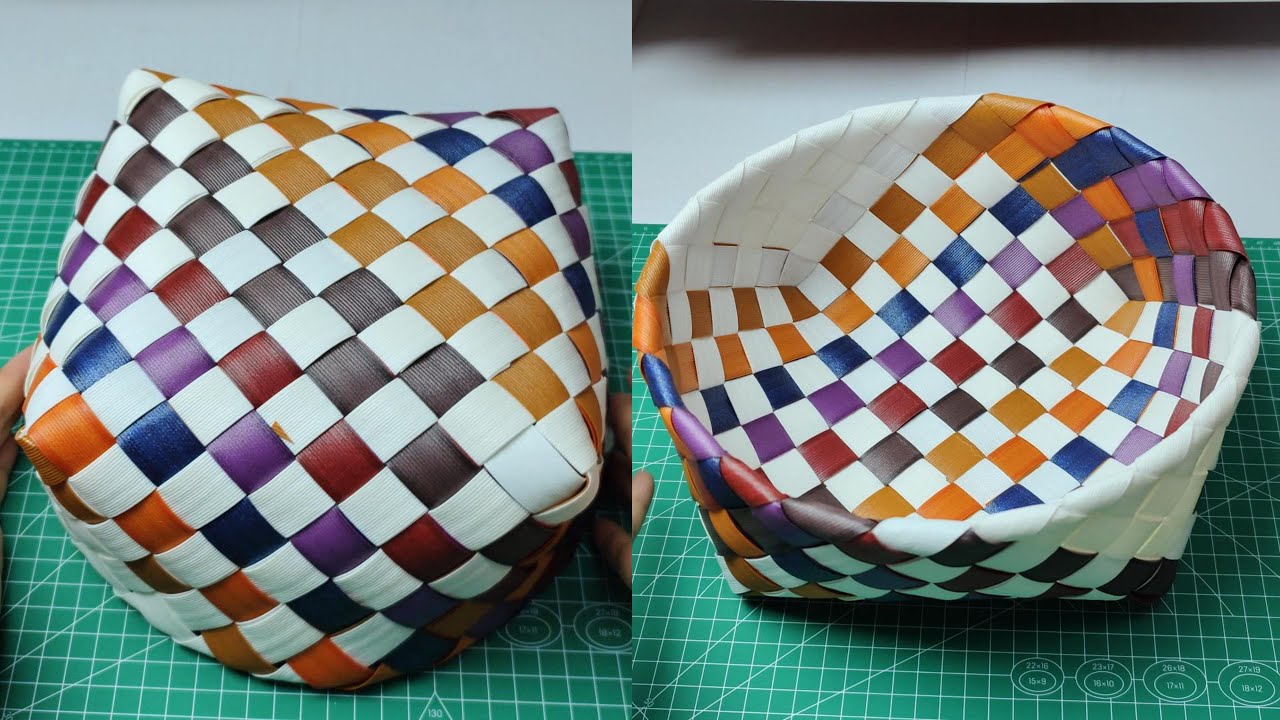
3. Weave the Base
- Begin by gluing the longer strips in a crisscross pattern to form the base of your basket.
- Secure each intersection with a dot of hot glue to keep it in place.
4. Build the Sides
Once your base is complete, it’s time to create the sides:
- Attach shorter strips vertically along the perimeter of the base.
- Carefully glue each vertical strip to the base at intervals, allowing space for weaving.
5. Final Touches
- Weave horizontal strips through the vertical strips, creating a pattern of your choice.
- Finish by securing the ends of each strip with glue and ensuring everything feels solid.
Now your unique colorful basket is ready! Consider using it for storage or as a decorative piece.
Common Mistakes to Avoid
Even the most enthusiastic DIYers can stumble along the way. Here are some common mistakes to watch out for when creating your colorful basket:
- Not cutting the strips to even lengths, which can result in an uneven appearance.
- Overlooking the need for a stable base, leading to a wobbly basket.
- Using insufficient glue, which may cause parts to detach.
- Forgetting to allow glue to dry completely before moving on to the next step.
- Rushing the weaving process, which can lead to inconsistency in patterns.
FAQs
What type of paper rattan strips should I use? Look for strips that are specifically designed for crafting, as they are durable and come in various colors.
How can I personalize my basket? You can mix and match colors, create different weaving patterns, or even add embellishments like ribbons or beads.
Can I wash my paper rattan basket? It’s best to avoid immersing it in water. Instead, spot clean it with a damp cloth to maintain its integrity.
Conclusion
A DIY colorful basket made from paper rattan strips brings a touch of creativity to your home. By following these simple steps and avoiding common pitfalls, you’ll create something truly unique. What colors and designs would you choose for your basket? Share your thoughts in the comments!